
This is Part 2 in Sitecore 9 - Multi Server Installation series and in this blog I will go through steps how to setup a dedicated Solr server. Sitecore 9 is using Solr as the default search engine for content search and xConnect search for on-premise installations. You must use Solr if you have scaled environment.
So, without further due, let's get down to business and go through steps to setup a dedicated Solr server that you can use for any of your Sitecore 9 instances (on the same network presumably). We are assuming you are working with a Windows Server 2016 with latest and greatest updates.
Sitecore 9.0 Update-1 requires Solr version 6.6.2. This Solr version doesn't exist as Bitnami package and it has to be installed manually. Additionally, Solr also needs to be setup to run as a Windows Service.
Here is the quick summary of what needs to get done to setup a dedicated Solr server for Sitecore 9
- Install latest JRE version
- Install Solr 6.6.2 and setup to run as Windows Service
- Enable SSL for Solr and ensuring secure connection between Solr and Web servers
- Install Solr cores for Sitecore and xConnect
Ok, now let's go through the actual steps to accomplish this.
Steps
- Download Sitecore 9 packages for XP0 setup from Sitecore and extract on your hard drive. Extract all files in a folder such as C:\sc9u1_resources for example. This is what the folder contents should look like. Make sure you extract all *.json files in the same folder as well.
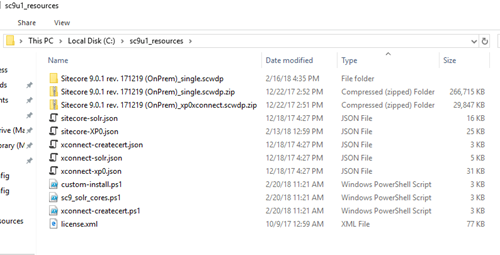
There are 3 PowerShell scripts in the above folder (custom-install.ps1, sc9_solr_cores.ps1 and xconnect-createcert.ps1) and all of them will be addressed in this series. We are going to use sc9_solr_cores.ps1 in this blog. - Make sure IIS is enabled with default settings on the server. This will make sure WebAdministation module is automatically installed which is required later during this setup process.
- Download solr-6.6.2.zip from http://archive.apache.org/dist/lucene/solr/6.6.2/ and extract to your hard drive in a folder such as C:\solr-6.6.2 for example.
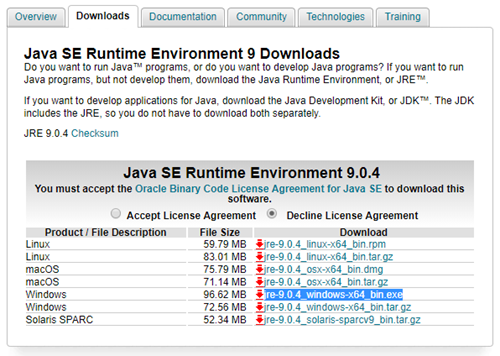
- Download and install latest JRE version (exe file) from http://www.oracle.com/technetwork/java/javase/downloads/jre9-downloads-3848532.html
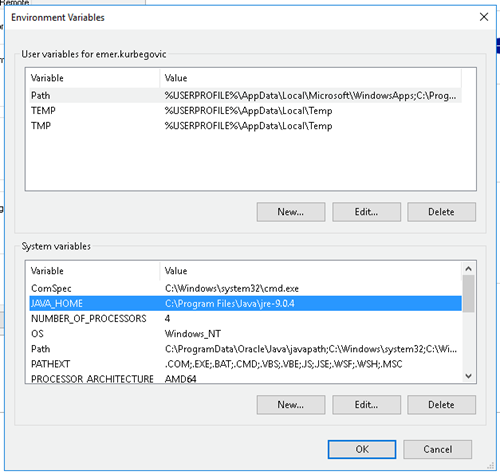
- Confirm JAVA_HOME Environment Variable is set in System variables (and do set it, if not set already)
- Setup Solr to run as Windows Service.
How you choose to do this is up to you and there are couple of ways to do this. One of the easiest ways is to use NSSM (Non-Sicking Service Manager).- Download NSSM (Non-Sucking Service Manager) and extract to your hard drive in a folder such as C:\nssm for example.
- Open up a Command Prompt as an administrator, go to the folder where you have extracted NSSM, then win64 folder and type following:
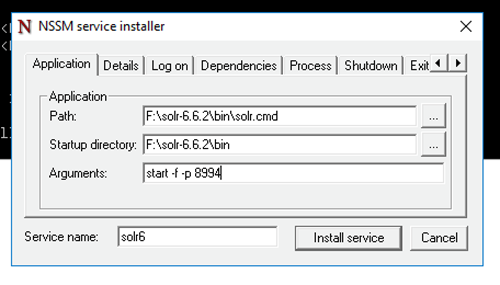
C:\nssm\win64> nssm install solr6 - NSSM Service Installer dialog box will pop up. In the Application Path navigate to and select solr.cmd, which will then auto populate Startup directory. In Arguments, enter the following start -f -p 8994 (8994 is the Solr port which you can change based on your requirements/needs. Make sure port you choose is not used by some other app or you will not be able to start the service!)
- Update Service name from solr6 to Solr 662
- Open up Services app and start the new Solr 662 service. If you've done everything right to this point the service should start without any issues.

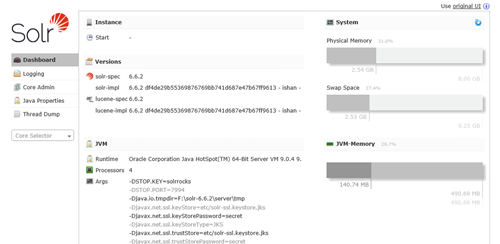
- Next up, make sure Solr is up and running by going to http://localhost:8994/solr on your server.
If Solr dashboard shows up you are good to go to the next step, otherwise you have to troubleshoot and make sure Solr is up and running before going anyfurther. - Enable SSL
Sitecore 9 is secure out-of-box and requires trusted connection between Solr and Sitecore so you will have to generate a Self-Signed Certificate and a Key, or in PROD environments you definately should purchase a Certificate. Folowing are steps to generate a Self-Signed Certificate and a Key:-
Open up a Command Prompt as an Administrator, go to the folder where you have extracted Solr 6.6.2, then server/etc and copy/edit/paste the below 3 lines one by one:
C:\solr-6.6.2\server\etc> "C:\Program Files\Java\jre-9.0.4\bin\keytool.exe" -genkeypair -alias solr-ssl -keyalg RSA -keysize 2048 -keypass secret -storepass secret -validity 9999 -keystore solr-ssl.keystore.jks -ext SAN=DNS:<SERVER_NAME>,IP:<SERVER_IP> -dname "CN=<SERVER_NAME>, OU=Organizational Unit, O=AE, L=Location, ST=State, C=Country"

C:\solr-6.6.2\server\etc> "C:\Program Files\Java\jre-9.0.4\bin\keytool.exe" -importkeystore -srckeystore solr-ssl.keystore.jks -destkeystore solr-ssl.keystore.p12 -srcstoretype jks -deststoretype pkcs12

C:\solr-6.6.2\server\etc> "C:\solr-6.6.2\server\etc\Openssl\bin\openssl.exe" pkcs12 -in solr-ssl.keystore.p12 -out solr-ssl.pem
- Adjust full path to keytool.exe and openssl.exe as needed for your environment.
- Make sure to replace <SERVER_NAME> and <SERVER_IP> with your SOLR server info. -
Next, go to the folder where you have extracted Solr, then bin folder and open up solr.in.bat in Notepad and un-comment SSL-related system properties section by removing "REM " at the beginning of the line. It should look like this when done.

- Open up Services app and restart Solr 662 service
- Make sure SSL is setup correctly by going to https://<SERVER_NAME>:8994/solr
8994 is the port you used when setting up Solr to run as a Windows Service. <SERVER_NAME> must be replaced with the server name you used earlier. - Add Solr certificate to the Trusted Root Certification Authorities store for a local computer.
- If Solr dashboard shows up and there are no SSL errors/warnings you can move on to the next step, otherwise troubleshoot and make sure Solr is running correctly with SSL. You cannot move to the next step until you have Solr running with SSL enabled.
-
- Install Sitecore Installation Framework
- Open up PowerShell as an Administrator and type in the following lines:
Confirm Untrusted repositories and install all.# Add the Sitecore MyGet repository to PowerShell Register-PSRepository -Name SitecoreGallery -SourceLocation https://sitecore.myget.org/F/sc-powershell/api/v2 # Install the Sitecore Install Framwork module Install-Module SitecoreInstallFramework # Install the Sitecore Fundamentals module (provides additional functionality for local installations like creating self-signed certificates) Install-Module SitecoreFundamentals # Import the modules into your current PowerShell context (if necessary) Import-Module SitecoreFundamentals Import-Module SitecoreInstallFramework
- Validate the installation by typing the following:
You should see something like this:Get-Module SitecoreInstallFramework –ListAvailable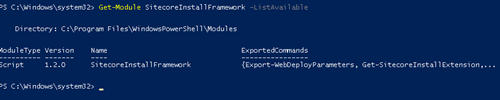
If everything is good, you are good to go to the next step. Otherwise, troubleshoot and make sure SIF is installed correctly.
- Open up PowerShell as an Administrator and type in the following lines:
- Install Solr cores for Sitecore and xConnect
- Copy/Paste sc9_solr_cores.ps1 from the GitHub repository and edit the parameters for your environment. Here is the complete file, parameters section is at the top of the file.
#define parameters $prefix = "sc9sitename" $PSScriptRoot = “F:\sc9u1_resources” $SolrUrl = "https://SOLR_SERVER_NAME:8994/solr" $SolrRoot = "C:\solr-6.6.2" $SolrService = "SOLR 662" #install solr cores for xdb $solrParams = @{ Path = "$PSScriptRoot\xconnect-solr.json" SolrUrl = $SolrUrl SolrRoot = $SolrRoot SolrService = $SolrService CorePrefix = $prefix } Install-SitecoreConfiguration @solrParams #install solr cores for sitecore $solrParams = @{ Path = "$PSScriptRoot\sitecore-solr.json" SolrUrl = $SolrUrl SolrRoot = $SolrRoot SolrService = $SolrService CorePrefix = $prefix } Install-SitecoreConfiguration @solrParams - As an Administrator, go to the sc9u1_resources folder and execute script in PowerShell by typing following:
.\sc9_solr_cores.ps1 - Confirm that required Sitecore cores have been installed by going to your Solr server dashboard and then clicking on Core Selector on the left. You should see newly added cores there.
- Copy/Paste sc9_solr_cores.ps1 from the GitHub repository and edit the parameters for your environment. Here is the complete file, parameters section is at the top of the file.
- Make sure you can establish secure connection to the Solr server from the Web server!
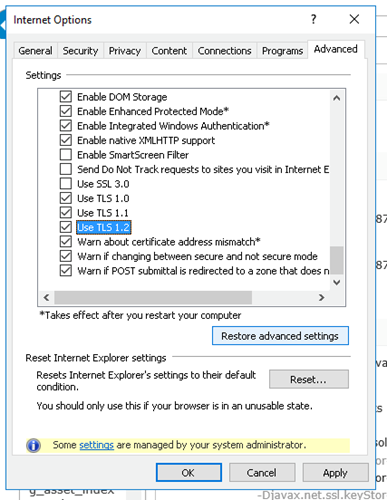
Go to the Web server and open up Solr dashboard by typing its url: https://<SOLR_SERVER_NAME>:8994/solr- You should see certificate error. Open Internet Options and make sure TLS 1.0, 1.1 and 1.2 are checked
- On your Web server, in the browser window, view Certificate Details and Install the certificate on the Web server

- Restart browser and go back to https://<SOLR_SERVER_NAME>:8994/solr. You should not have certificate error any longer. Solr dashboard should look like this when viewed from your Web server (no certificate errors).
- You should see certificate error. Open Internet Options and make sure TLS 1.0, 1.1 and 1.2 are checked
- Solr setup is completed. Congratulations!
References
- https://blogs.perficient.com/sitecore/2017/10/26/setup-and-basic-preparation-for-sitecore-9-installation/
- https://blogs.perficient.com/sitecore/2017/10/23/how-to-install-sitecore-9-with-the-sitecore-install-framework/
Scripts
All scripts used in this series are available in the GitHub repository. You will have to download Sitecore 9 packages from Sitecore Experience Platform 9.0 Update-1 page.
Summary
Next blog article in this series will address setting up a dedicated SQL server.
